Saanzori or Saanza Poli

‘Saanza’ is another name for ‘Sheera’ and a Saanzori is a kind of ‘poli’ or roti made with stuffed Saanza. While its ‘cousin’ – the Puran Poli – is more popular, Saanzori is a special dish that is rarely available outside homes making it all the more special. My mom is an expert at making saanzoris – so I’ve grown up partial to this particular sweet. She decided to make it for a special occasion at home recently…so I managed to capture some parts of the process on video. So here’s a first on the solkadhi blog – an amateur video in addition to the actual recipe.

Ingredients:

For the Saanza or Sheera:

  • Rava (Sooji) – 1 cup (try and use the coarse rava, if possible)
  • Water – 1& 3/4th cups
  • Jaggery – 1&1/4th cups
  • Ghee – 4 tspns
  • Elaichi (Velchi) or Cardamom Powder -1/2 tspn
  • Jayphal (nutmeg) powder – 1/2 tspn
  • Salt – a pinch

For the cover;

  • Maida – 3/4th cup
  • Wheat Flour – 3/4th cup
  • oil – 7-8 tspns
  • salt to taste

Procedure:

Roast the rava in a dry pan for a bit till it gives out an aroma. Keep aside

Making the dough for the cover:

Making the dough for the cover of a saanzori is an involved process. Mix the Maida & Wheat flour, add 3-4 tspns of oil and salt and knead with requisite amount of water to a very very soft consistency. Then again add 2-3 tspns of oil and knead again. Spread the kneaded dough slightly, make some ‘pockets’ in it with your fingers, and add about 2-3 tspns of oil spread into the ‘pockets’. Cover and keep aside. After about 2 hours, once again, knead the dough. Repeat the whole process for at least another round. The final consistency of the dough – after 5-6 hours – should be highly elastic.

Making the Saanza:

Mix the jaggery, ghee, cardamom & nutmeg powder and salt in water and bring it to a boil. Keep stirring while it comes to a boil. Once the jaggery is dissolved, lower the flame and slowly add the roasted rava, stirring continuously. Mix well till it all blends together, cover with a lid and steam.  Stir a couple of times as it steams. The saanza comes together as it cooks into a sort of integrated mass. Cook till it gets a little dry – the saanza should not remain sticky. Remember it has to be stuffed inside dough and rolled into a poli – so it can’t remain sticky. The saaza takes about 5 mins to cook overall.

Keep the cooked saanza aside for 3-4 hours – it needs to cool down completely.

Making the Saanzori:

Make largish ladoos or balls of the saanza. Similarly, make small balls out of the dough. Wrap the dough gently around the saanza ladoos. Keep the wrapped saanza balls on a layer of rice flour else they stick to whichever surface you keep them on. Roll out into polis (rotis) and cook them on the tava like you would regular parathas or rotis, adding ghee while on the tava. The video depicts this saanzori making process.

Saanzoris last for a few days without refrigeration – so they are ideal to carry on a journey too.  They can be eaten as-is – though the make a great combo with lime pickle (or any other pickle, for that matter).


Daaleecha Sambaaraa

We all have our ‘comfort foods’ – and Daaleecha Sambaraa or Daaleechi Amti…or, as the Nadkarni family tends to refer to it, “Banda aamti” (after our ancestral hometown of Banda) is one such. A Sunday lunch of fried fish, kuleeth (horsegram) usal, kusbeer, Daaleecha Sambaaraa and Solkadhi….coupled with loud & boisterous conversation as we linger over the food long after our plates are dry…is enough to satiate the simple Nadkarni soul!

So without further ado, I present here a simple dal recipe that is unique in its taste. The interesting thing about this dal preparation is that NO OIL is used!

Version 1: With Drumstick-

Ingredients:

  • Toor Dal – 1 cup
  • Onion, medium size – 1, finely chopped
  • Drumstick – 1, with its skin removed and cut into approx 2 inch pieces. 7-8 pieces is what you would need
  • Fresh grated coconut – 2 to 3 tablespoons
  • Green Chillies – 4 to 5
  • Haldi (Turmeric) – 1/2 tsp
  • Tamarind – size of 1 lemon
  • Coriander
  • Salt to taste

Version 2: With Jackfruit seeds (see further below)

Procedure:

Keep about 1 tsp of the chopped onion aside

Soak the tamarind in some water and keep aside

Pressure cook the dal with some water for 2 whistles. Keep Aside

In a pan, pour about 2 cups of water and add the drumstick pieces, the remaining chopped onion, 2-3 green chillies (slit down the middle), turmeric and salt to taste (should be sufficient for the dal too). Cover with a lid and steam till the drumstick is fully cooked.

Then add the cooked dal and tamarind pulp (from the tamarind soaked earlier) and boil for a good five minutes – till the raw smell of tamarind fades away.

While the above is being steamed & boiled, grind the grated coconut, 1 tspn of chopped onion, 1 or 2 green chillies (depending on how much spice you can take) with a little water. Coarsely grind – take care that it doesn’t become a fine paste. This is known as the ‘Vatap’ or ‘Goli’ in Kokani.

Add this ‘vatap’ to the boiled dal above and bring it to a light boil. Add chopped coriander leaves and serve.

Daaleecha Sambaaraa is best eaten with rice

Daleecha Sambaaraa with Jackfruit Seeds:

Note – Whenever you have Jackfruit, wash the seeds thoroughly and dry them – in the sun, if possible- for a few days and store. You can make a number of delicacies with them and also use them to add some zing to other dishes like this dal or some bhajis (sabjis)

If you are lucky enough to lay your hands on jackfruit seeds, then this is the slight variation in the prep of Daaleecha Sambaaraa:

Remove the fine shell on the jackfruit seeds (if it still remains) and chop them into two or, at max, four pieces. When pressure cooking the dal, cook it with the jackfruit seeds and the chopped onions (unlike in the drumstick version where you cook the onion with the drumsticks)

Rest of the procedure is the same as in the drumstick version of the dal.

Phanasaachi Bhaji (Raw Jackfruit Bhaji)

Being Mother’s day today, what better occasion than to post a few recipes that my mom makes wonderfully well – which are nothing ‘elaborate’, but rather part of our everyday diet and those that one tends to long for after extended periods away from home. Here is the first of these – made from something that I love both in its raw form (as this Bhaji) as well as in its ripened avatar – Jackfruit or ‘phanas’ (as it is called in the konkan region)

Incidentally, raw jackfruit bhaji (or sabji) can be made at two ‘stages’ of the raw jackfruit :

  • One is when the jackfruit is really a ‘baby’ – small, tender, yet to be formed and is about 3/4th of a foot or smaller in length
  • Two is when it is fully grown and mature but yet to ripen.

In the konkan region, there is a special term used for each stage. The first baby raw phanas is called ‘Kuvra’ or ‘Kuvro’ while the mature one is called ‘Garyaa-Gotyaacha Phanas’.

This recipe is for a ‘kuvra’ phanas.

Note: While buying a Kuvra phanas, make sure that it is green…and the stem is also green. This is an indication of freshness.

Ingredients:

  • Kuvra Phanas / Raw Jackfruit – 1 (about 3/4th foot in length)
  • Toor Dal – 4 tspns
  • Onion (medium size) – 1, finely chopped
  • Fresh Coconut – grated – 1/2 cup
  • Whole Black Peppers – 8 to 10
  • Jaggery – 1/2 tsp
  • Mustard Seeds (rai) – 1/2 tsp
  • Turmeric (haldi) – 1/2 tsp
  • Asafotida (heeng) – 1/2 tsp
  • Green Chillies – 1 or 2, slit
  • Red Chilly Powder – 1/2 to 3/4th tsp
  • Oil – 1-2 tspns
  • Salt to taste

‘Prepping’ the Phanas:

The raw phanas is full of a kind of liquidy resin, called ‘dinka’ in Marathi/ Konkani. So before you cut the phanas, spread some old newspapers and apply some oil on the knife you use as well as smear some on your hands – else it gets difficult to get the sticky resin off later. As you start cutting the phanas, the ‘dinka’ starts oozing out – hence the old newspapers. Keep wiping off the ‘dinka’ with old newspaper bits.

Cut the phanas along its length into two halves. Then cut the individual halves into 2 or 3 pieces, so that each piece is approximately the size of your palm. Put these large pieces in water as you cut them and then wash them thoroughly 2-3 times.

Pressure-cook these pieces adding a little salt & water-  for 2 whistles & an additional 2 minutes on a low flame. Allow this to cool and then get to chopping the phanas for the actual bhaji. The pressure cooking is a short-cut to ensure that the thick skin/ cover of the phanas comes off easily.

Take the cooled pieces and cut out the skin as well as the thick portion at the centre of the phanas – the core. There is a special term for this portion as well in the Kokani (malvani) language – called the ‘maav’. The remaining part of the phanas is the edible part. Chop this into approximately 1 sq cm pieces. Now you are ready to make the bhaji

Procedure:

Wash and soak the toor dal in water for a few hours. (So make sure you do this either the previous night or a few hours before you intend to make the bhaji)

Grind the fresh grated coconut and the black peppers coarsely – it should NOT become a fine paste. Just ensure that the peppers get properly ground. Keep aside.

In a pan, heat the oil and add the mustard seeds. Once they pop, add the haldi, heeng and green chillies. Then add the chopped onion and saute till the onion turns transluscent. Next add the soaked toor dal and saute some more. Then add some water (about 1/4th cup) and steam, putting some water on the lid too.

Once the onion and dal is fully cooked, add the chopped phanas, red chilly powder and salt to taste (remember you have pre-cooked the phanas with some salt too – so account for that!). Mix it all together and steam, covering the pan with a lid.

Then add the ground mix of coconut+peppers and the jaggery, stir till they blend well with the rest of the bhaji and steam some more for a bit – and your Phanasaachi Bhaji is done!

Have with rice or chappaties (rotis).

Note: You can use Black peas (Kaala Vaataana) instead of Toor Dal too (just that kaala vaataana is not that easily available)

Aamba Daal

Aamba daal is one of those quick-n-simple recipes that make you wonder how such a simple recipe can taste so heavenly. Raw mango being an essential element of Aamba Daal (sometimes also referred to as ‘Vatli Daal or ‘Kairichi Dal’), it is a dish associated with summer.

In fact, during haldi-kunku gatherings – a popular social tradition in Maharashtra – in the month of Chaitra as per the Hindu Calendar, Aamba Daal & Kairi Panha is the standard menu. For me personally, Aamba Daal is very strongly associated with childhood memories of the 11-day Ganpati festival that used to be celebrated with great gusto at the Maharashtra Mandal in Chennai. For reasons I have never questioned, Aamba Daal used to be the standard menu on the last day of Ganpati – post visarjan – when we would trudge back after bidding adieu to Ganpati & eleven eventful evenings and be fed Aamba Daal to get our spirits up.

Ingredients:

  • Chana Daal – 1 cup
  • Green Chillies – 1 or 2
  • Fresh, grated coconut – 1 tablespoon
  • Raw Mango (grated) – 1 to 1.5 tablespoons (This depends on how sour the raw mango is – the more sour it is, the less you need)
  • Sugar – a pinch
  • Oil – 2 tablespoons
  • Mustard seeds (Rai) – 1/2 a tspn
  • Asafoetida (hing) – 1/4th tspn
  • Turmeric (Haldi) – 1/4th tspn
  • Dry red chilly – 1 (optional)
  • Coriander (chopped) – 1 tablespoon

Preparation:

Soak the Chana Daal for 2-3 hours at the minimum. Transfer it to a strainer and leave it for 10-15 minutes so that all the water is completely drained.

Then add salt & green chillies and grind it to a very coarse consistency. When using a mixie, this gets done in a jiffy so watch out as you don’t want a paste. Transfer to a bowl and add the coconut, raw mango and pinch of sugar to this, mixing well.

Make the tadka (or Phodni – as it is called in Marathi) in a tadka laddle or small pan. Heat the oil and add the mustard seeds. When they pop, turn off the gas. Then add the Hing, Haldi and red chilly (cut into 2 pieces). The red chilly is optional – it adds a certain flavour to the dish but also ups the spice levels.

Cool the phodni to room temperature. Then pour it over the Chana Daal mix & blend. Top it off with chopped coriander and get ready to dig into this yummy summer treat.

Aamba Daal can be eaten as is – as a snack or in lieu of a salad.


Kusbeer or Kismur – a Dry Fish Delicacy

As the monsoon begins its advance into the country, I am reminded of dry fish….and Kusbeer!

For my vegetarian friends, this very same dish can also be made with roasted (not fried!!) papad. Tastes equally good – so read on…

The monsoon season and the heavy rains it brings engulfs the western coast of India for 3 – 4 months. In the earlier days, when there were no mechanised boats and hence deep sea fishing was not possible, no fishing was done during the monsoon. More importantly, this is also the fish breeding season – so fishing continues to be a big ‘No’ even today during this season. In fact, some states have laws against fishing during the monsoons.

However, the kokani palate needs its fish! So that is how dry fish came into the cuisine. Fish like prawns, mackerel (bangda), bombay duck (bombil) etc are dried under the sun by fisherfolk during the summer months – for consumption during the monsoons. Most kokani families stock up on dry fish in the month of May before the onset of the monsoons.

A variety of dishes are made with dry fish. Kusbeer (also known as Kismur in Goa) is one such – which is my favorite! Kusbeer can be made with dry prawns or shrimp – or even dry mackerel.

A couple of ‘fundas’ about dry prawns:

You get two varieties of dry prawns on the west coast of India – ‘Sungata‘ – which are the larger variety and ‘Golma‘ – which are the tiny dry prawns. They are also known as ‘Jawala‘ – should you go looking for them in the market. I have come across packets of ‘Jawala’ in some supermarkets.

The Sungata need to be cleaned – you need to remove the head, tail, etc. I will do a separate post one day – with pictures – of cleaning sungata. For now, if you are not familiar with the process either get it done by your local fisherwoman (yes, they do it for you!) or stick to using Golma / Jawala for this dish – which is less complex to clean!

To clean Golma, first sieve it properly. Remember, these are often dried in the open on the seashore – so they are likely to have sand or fine stones mixed in them (depends on where you buy the Golma from). Hence the sieving is necessary. Then do a round of manual cleaning – check for any left-over tiny stones or any other particles.

Also – it is important to remember that fish are dried with salt. So, take that into account while making any dish with dry fish.

Now you are ready to make the Kusbeer…

Ingredients:

  • Golma / Sungata – 1 cup
  • Onion – finely chopped – 1 cup
  • Coconut – fresh, grated – 1/2 cup
  • Red Chilli Powder – 1/2 tsp
  • Oil – 1/2 tsp. This dish tastes great with coconut oil. So if you like/ have access to coconut oil, best to use that.
  • Salt to taste. Since the dry fish is already salty, you would need less than half a tsp of salt for this dish.

Procedure:

Stir-fry the dry fish in half a teaspoon of oil on medium flame – till they become really crisp. In fact, they give out a lovely aroma which is unique to dry fish as they get done. Keep aside.

Mix the finely chopped onion, red chilli and salt in a separate serving bowl. In fact, they need to be ‘crushed’ together by hand and mixed really well. The term in marathi for this is ‘churadnay‘.  Keep aside.

Just before your meal, add in the coconut and the stir-fried dry fish. Mix really well. Add a tsp of coconut oil and serve!  It is important to mix it ‘just-in-time’ – else the dry fish lose their crispiness.

Eat with chappatis, rotis or rice.

For enhanced taste, you can also add 1 tsp of soaked aamsol/kokum water. Add it to the onion while crushing.

For all ye vegetarians out there:

Instead of dry fish, you can make this with roasted papad. Use your regular Lijjat papad variety. Roast the papads and crush them into tiny pieces. And follow the exact same recipe above. Believe me, it tastes yummm and can add a zing to any meal!

Dhondas – a kind of traditional ‘cake’

Ever wondered how a ‘cake’ can be made out of cucumber? Well…this is what Dhondas is made of  – along with jaggery and rava (sooji). And all ye veggies out there – this will gladden your heart as there is no egg involved!

Dhondas is a traditional sweet made in most GSB households – and a huge favorite. You absolutely MUST try this out….

BTW, the cucumber to be used here is the large variety  – which is at least a 3/4th foot long and a couple of inches in diameter. Try not to use the regular small slim ones that we use for salads etc.

Ingredients:

  • Cucumber (Large) – peeled and grated – 1 cup. Note: Retain the water that you get while grating the cucumber as it is also used for this dish
  • Rava (sooji) – 1 cup. Use your regular rava that is ‘medium’ sized. Not the very fine variety nor the coarse one.
  • Jaggery – 1 cup. If it is in a big lumpy form, either grate the jaggery or cut it into pieces.
  • Melted Ghee – 4 tsps
  • Nutmeg – 1/4th tsp
  • Cashewnuts – 8-9, chopped into smaller pieces.
  • Coconut (optional) – cut into small bits or grated – 1 tablespoon
  • Salt – 1/2 tsp
  • Baking Soda – 1/4th tsp

Procedure:

Mix the cucumber, cucumber water, jaggery, cashewnuts, coconut and salt in a pan and bring to a boil. Basically heat the mix till the jaggery starts melting and comes to a boil. Stir once in a while. Don’t let it boil too much and thicken – the jaggery should remain ‘liquidy’. Keep this mix aside and allow it to cool down.

In a separate pan, heat the ghee and roast the rava in the ghee till it is well roasted. A good indicator that the rava is well roasted is the wonderful aroma that arises :). Keep aside and allow this also to cool.

Then add the mix to the roasted rava, add in the nutmeg powder and baking soda. (Tip : Dissolve the baking soda in 1 tsp of milk, ensuring no lumps are formed, and then add it to the mix). The resulting batter should be of a cake batter consistency. Sometimes, depending on the variety of rava used, the batter becomes very thick and rather dry. If this happens, add a little milk to soften it.

Bake this like you would bake a regular cake. To test if it is done, put a knife straight thru the dhondas and pull it out. If no remains stick to the knife, it means that your dhondas is done.

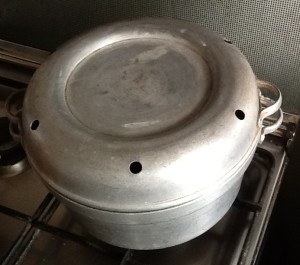
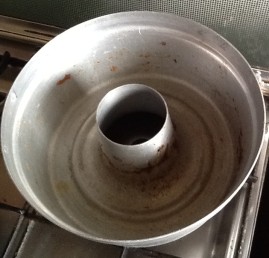
BTW, here is an interesting aside. In the earlier days when ordinary folks did not have access to an oven, a variety of contraptions were used for baking. My mom was gifted the one in the picture below at her wedding more than 40 years ago – which she continues to use even today.

Cake Patra – How it looks from outside

Cake Patra – an internal view. Taken just after the dhondas was made

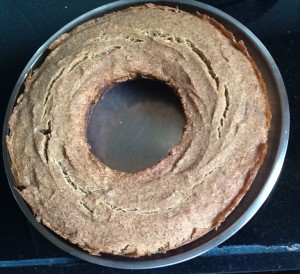
This is put on the gas stove and used for baking.  I remember all cakes in my house being baked in this vessel. In fact, the dhondas pictured below has been baked in this….take a look:

Do try out the dhondas and let me know how it turned out 🙂

Solkadhi – The Original Recipe

A friend of mine asked me a pertinent question – when this project and the blog is titled ‘Solkadhi’ how come I haven’t posted its recipe? Point! So here goes…

Solkadhi is a preparation that is quite popular – and made even more so by the many restaurants who specialise in Coastal cuisine from western India. Naturally, many versions of Solkadhi are available in the market. However, as is the case with most dishes across cuisines, the authentic recipes made at home are indeed quite different from the versions available in restaurants. And the purists tend to turn up their noses at the ‘commercial varieties’ 😉

Recipes for Solkadhi also tend to subtly vary across families. I have recorded two recipes  made in my family – plus a ‘shortcut’ one. And then there is a ‘cousin’ of the Solkadhi, called ‘Tiwal’ – which is made without coconut. Am going to note that down too – in a separate post.

About Solkadhi

Solkadhi is made from Kokum or Aamsol – a fruit that is grown in the region. I am not going to digress into details about kokum itself. Instead, here are a couple of interesting posts I came across on the topic – you may want to check them out: ‘Kokum – the kool king‘ and ‘The mystique of kokum

Solkadhi is like a ‘staple’ dish that used to be on the daily menu of most homes in our part of the world. It is like what Curd or Rasam or buttermilk is to many of my friends from other parts of the country. In fact, in our home, over the last few years, my parents have reverted to having Solkadhi with every meal. I was asking my dad what is the ‘big deal’ about Solkadhi. Being the healthcare expert that he is, he explained that it contains ‘fungal diastase‘ – which helps with 1st stage digestion of carbohydrates in the body. It helps reduce the ‘bulk’ in the stomach – which is why it is considered a ‘must’ with heavy food rich in carbs. Given that Konkan is basically a rice & fish eating region, it explains why this must have evolved. Besides, kokum itself is supposed to be an excellent antidote for acidity.

Recipe #1:

Ingredients

  • Fresh Coconut – grated, 1 cup
  • Aamsol or Kokum – 7 to 9
  • Green Chillies – 2, medium length, cut into 2-3 pieces
  • Ginger – 1/2 inch, peeled and diced into 4-5 pieces
  • Asafoetida (Heeng) – qtr tsp
  • Salt to taste

Procedure:

Soak the kokum in about 3/4th cup water adding the Heeng and Salt. Keep aside for a couple of hours.

Now comes the critical grinding-of-the-coconut part. This used to be done on a stone grinder (called ‘Pata Varvanta’ in Marathi) in the pre-mixer days – I recollect helping my mom do this occasionally in my childhood. While most folks have switched to mixer-grinders, those who have eaten food containing spices & masalas ground on stone grinders insist that the same flavours don’t emerge when using a mixer. The fundamental difference is that in a mixer, the ingredients get “finely chopped” – while on a stone grinder, they get ground and pressed together while getting broken down.

Anyways, so in our ‘modern day’ methodology, this is how you proceed : grind the coconut, ginger and green chillies with 3/4th cup water in the mixer. When it grinds to a decent paste, squeeze the ‘milk’ out of the paste and keep aside. Add another 3/4th cup of water to the dry remains and run the mixer again for a minute or so. Again extract the milk – adding to the original extract. Repeat a couple of more times – till basically all the ‘milk’ gets extracted from the coconut and you start extracting only clear water.

Add the extracted ‘milk’ to the pre-soaked kokum above and blend. Keep aside for a couple of hours – it is important to let the Solkadhi ‘be’ for at least a couple of hours before you consume it. And remember to stir the Kadhi everytime you serve it – the coconut extract tends to rise to the top when the kadhi is left untouched for a bit!

And BTW, the kokum is supposed to be thrown away after consuming the kadhi – don’t eat them by mistake 🙂 (It happened with someone I know – so I just thought I should mention it!)

Solkadhi is eaten traditionally with rice – “kadhi-bhaat’ is usually the last course in a meal. While it certainly goes well with fish and meat dishes, it is also lovely to have with your ordinary bhaaji or sabji.

A few important points:

– Although Solkadhi is commonly ‘positioned’ as a drink (and hence is served a tad sweetened), original solkadhi is meant to be eaten with rice.

– A lot of commercial establishments use something called ‘Kokum Aagal’ – a Kokum juice extract that is available in the market- instead of soaked kokum to make kadhi. When in a pinch, you could probably use the “aagal” I guess. The only issue is that most commercial products are sold with sugar added to the Kokum Aagal (so that it can double up as a base for Kokum juice) – and that tends to completely spoil the taste of the Solkadhi.

Recipe #2:

The difference is only in the ingredients used to spice the Kadhi. So the combination of ingredients in this version of the kadhi are:

  • Fresh Coconut – grated, 1 cup
  • Aamsol or Kokum – 7 to 9
  • Garlic – 5-6 big pods, peeled. These should be ‘crushed’ (use a pestle or a stone) before use. In fact, always crush garlic before using in any recipe as the crushing helps release the beneficiary oils that garlic is known for
  • Black Peppercorns – 7 to 8
  • Asafoetida (Heeng) – qtr tsp
  • Salt to taste

The procedure is exactly the same as given in Recipe #1. Instead of grinding the coconut with chillies and ginger, grind it with the garlic and black peppercorns.

BTW, this garlic-black pepper version of the solkadhi is particularly given to people recuperating from an illness or to young mothers. It also goes very well with a non-veg meal.

Recipe #3 – the Shortcut method:

Since one is perpetually short of time these days, here is a short-cut version of the Solkadhi. Again, purists frown on this version…but when one doesn’t have the luxury of time or household help, atleast one can still enjoy Solkadhi.

The short cut version basically uses coconut milk instead of grated coconut.

Ingredients:

  • Aamsol or Kokum – 7 to 9
  • Green Chillies – 2, medium length, cut into 2-3 pieces
  • Ginger – 1/2 inch, peeled and diced into 4-5 pieces
  • Asafoetida (Heeng) – qtr tsp
  • Coconut Milk – 1/2 cup
  • Salt to taste

Soak the kokum in 3/4th cup water with Heeng & Salt plus the Chillies and Ginger for a couple of hours. You can even use ginger & chilly paste. Add the coconut milk after the kokum is soaked. Keep aside for at least an hour or so before consuming.

Enjoy! 🙂

Aambat Batata – a Potato Dish

Continuing on the theme of Devakarya menu from my last post (Ginger Chutney), here is another dish with is also a staple on the menu – Aambat Batata.  ‘Aambat’ means ‘sour’ in Marathi – although, like in most Indian cuisines and, therefore, in Indian languages, there are different types of ‘sour’ tastes – so the actual taste kinda gets lost in translation here. The ‘sourness’ of Aambat Batata is very light…so I guess a closer approximation would be to describe it as ‘tangy’ perhaps? Best is for you to try it out and decide for yourself.

Aambat Batata is a favorite with my sister-in-law. And since she lives outside the country and doesn’t have the time – like most of us – Aai has designed a ‘short-cut’ recipe for her. So am going to give you the original recipe here followed by the ‘short-cut’ one.

ORIGINAL RECIPE:

Ingredients:

  • Potatoes – 3 to 4, medium sized. Cut them into long slices – approximately the length of the potato, about 1/2 inch in breadth and 3/4th cms thick. Tip: If you are dicing the potatoes a couple of hours or more prior to the actual cooking, remember to soak the potatoes in water. It prevents them from darkening.
  • Tamarind – the size of one small lemon. Soak for an hour or so and extract & use the pulpy juice.
  • Coconut – grated, 1 cup
  • Black Pepper Corns – 8 to 10
  • Rice – 1/2 tsp (or 1 tsp of rice flour)
  • Red Chilli Powder – 1 tsp
  • jaggery – 1/2 tsp
  • Salt to taste

For the Tadka or ‘Phodni’ (as we call it in Marathi):

  • Mustard Seeds (‘Mohri’ or ‘Rai’) – 1/2 tsp
  • Asafoetida (‘Heeng’) – 1/2 tsp
  • Fenugreek (‘Methi’) granules – 1/2 tsp
  • Turmeric (‘haldi’) – 1/2 tsp
  • Oil – 2 to 2.5 tsps

Procedure:

First make the ‘Goli‘ or ‘Vaatap‘ – which is basically the coconut-based paste that is the basis of most gravies in this region. ‘Vaatap‘ means ‘that which has been ground

Mix the coconut, black peppercorns, and rice (or rice flour) and grind to a fine paste, adding water only as required. The resultant paste should be thick, not watery! Keep aside. You can also make this ‘vaatap’ on an earlier day(s) and store it in the freezer. Only thing is remember to thaw it properly before you make the actual dish.

Heat the oil in a pan. Add the mustard seeds, allow them to splutter, then add the Methi, Heeng and Haldi. Add the diced potatoes, salt and red chilli powder. Then add enough water to ensure that the potatoes are completely submerged in the water. Steam on a low-to-medium flame till the potatoes are cooked. Remember to cover the pan with a flat lid and pour some water on the lid while steaming. Some varieties of potatoes take a long time to cook – so keep checking and adding   water as required if the potatoes are taking longer to get done.

When the potatoes are near-done, add the tamarind paste and boil for about 5 mins – till the ‘raw’ smell of the tamarind goes away. I asked my mom a silly question at this point – why cant we wait till the potatoes are fully cooked before we add the tamarind paste. She said because the whole thing needs to be boiled for 5 mins after the tamarind paste is added – and if the potatoes have been fully cooked, then they tend to break and dissolve when this boiling is going on. Duh!

Once this is done, add the ‘Vaatap’ – the coconut-based paste – and the jaggery and bring to a light boil over a low flame. As with all coconut-based gravies, make sure you don’t bring this to an ‘active’ or ‘big’ boil.

And your Aambat Batata is ready…

THE SHORT-CUT RECIPE:

The short-cut method basically does away with the ‘Vaatap”

Ingredients:

  • Potatoes- same as the ingredients above
  • Tamarind option – you can use readymade tamarind paste instead of tamarind. Mix 1/2 tsp of tamarind paste in 1/4th cup water and blend well.
  • Coconut Milk – thick, available readymade – 1/2 cup. This is instead of the grated coconut.
  • Pepper Powder – 1/2 tsp. This is instead of the whole pepper corns
  • Rice Flour – 1/2 Tsp
  • Red Chilli Powder – 1 Tsp
  • Jaggery – 1/2 tsp
  • Salt to taste

For the Tadka or Phodni – same as given above in the original recipe

Procedure:

Follow the same procedure as given in the original recipe till the stage where you need to add the tamarind paste. Here, use the readymade tamarind paste option as given in the ingredients above.

Next, instead of the ‘Vaatap’, we are going to use the coconut milk. First blend the rice flour into the coconut milk making sure no lumps remain. Add this to the potato mix in the pan, then add the pepper powder and jaggery. Bring to a low boil over a low flame.

Aambat Batata goes well with rotis, rice and even puris.