Sabudana Khichadi

Can any ‘Upas’ season kick off without the all-time-favorite dish from Maharashtra – Sabudana (Sago) Khichadi? Over the years, when asked the question ‘What would you like for breakfast?’ by my mom, the standard answer from friends visiting from outside Maharashtra has always been ‘Sabudana Khichadi! (or Poha). In a recent conversation with a friend, when I mentioned I was planning to do a few posts on ‘Upas’ dishes, she said “hope you don’t forget Sabudana Khichadi”. So here goes the recipe from my mom’s kitchen. There are, am sure, many varieties to the prep across households…but this is how we make it at home.

Ingredients:

  • Sabudana (Sago) – the large variety – 1 cup
  • Groundnut Powder – 1/2 cup (roasted groundnuts, coarsely ground)
  • Green chilly – 1 large or two small, cut into slices
  • Jeera – 1/2 tspn
  • Ghee or Groundnut Oil – 3 to 4 Tablespoons (in liquid form)
  • Salt to taste (1/2 to 3/4th tspn usually suffices for the above quantity of Sabudana)
  • Sugar – 1/2 tspn
  • Boiled Potato (Optional) – 1 -medium-size, cut into 1 sq cm slices or cubes

Procedure:

The Sabudana needs to be soaked for a good 5-6 hours. So if you plan to make the khichadi for breakfast, it is best to soak the Sabudana the previous night. Wash it gently and soak it in water that is about level with the quantity of sabudana. The resultant soaked sabudana has to be soft. There are many varieties of sabudana available- some tend to need more water to soak and some less. So if you feel that the sabudana is still hard after a couple of hours, add some more water to it.

To get started with the Khichadi, add salt, sugar and the groundnut powder to the soaked sabudana and mix well.

In a pan, heat the ghee/oil, add the jeera, then the green chillies and fry till the chillies turn a little whitish in colour. Then, if you are adding potatoes, add the sliced potato (along with a little salt for the potato only) and stir till the potatoes turn a little brownish. Then add the sabudana mix prepared earlier and mix well. If the sabudana is a little hard, sprinkle some milk to soften it up. Keep stirring as it cooks. The sabudana usually gets cooked in 2-3 minutes.

Garnish with freshly grated coconut, coriander or even squeeze a little lemon juice over it – to add to the taste. Serve hot.

Saanzori or Saanza Poli

‘Saanza’ is another name for ‘Sheera’ and a Saanzori is a kind of ‘poli’ or roti made with stuffed Saanza. While its ‘cousin’ – the Puran Poli – is more popular, Saanzori is a special dish that is rarely available outside homes making it all the more special. My mom is an expert at making saanzoris – so I’ve grown up partial to this particular sweet. She decided to make it for a special occasion at home recently…so I managed to capture some parts of the process on video. So here’s a first on the solkadhi blog – an amateur video in addition to the actual recipe.

Ingredients:

For the Saanza or Sheera:

  • Rava (Sooji) – 1 cup (try and use the coarse rava, if possible)
  • Water – 1& 3/4th cups
  • Jaggery – 1&1/4th cups
  • Ghee – 4 tspns
  • Elaichi (Velchi) or Cardamom Powder -1/2 tspn
  • Jayphal (nutmeg) powder – 1/2 tspn
  • Salt – a pinch

For the cover;

  • Maida – 3/4th cup
  • Wheat Flour – 3/4th cup
  • oil – 7-8 tspns
  • salt to taste

Procedure:

Roast the rava in a dry pan for a bit till it gives out an aroma. Keep aside

Making the dough for the cover:

Making the dough for the cover of a saanzori is an involved process. Mix the Maida & Wheat flour, add 3-4 tspns of oil and salt and knead with requisite amount of water to a very very soft consistency. Then again add 2-3 tspns of oil and knead again. Spread the kneaded dough slightly, make some ‘pockets’ in it with your fingers, and add about 2-3 tspns of oil spread into the ‘pockets’. Cover and keep aside. After about 2 hours, once again, knead the dough. Repeat the whole process for at least another round. The final consistency of the dough – after 5-6 hours – should be highly elastic.

Making the Saanza:

Mix the jaggery, ghee, cardamom & nutmeg powder and salt in water and bring it to a boil. Keep stirring while it comes to a boil. Once the jaggery is dissolved, lower the flame and slowly add the roasted rava, stirring continuously. Mix well till it all blends together, cover with a lid and steam.  Stir a couple of times as it steams. The saanza comes together as it cooks into a sort of integrated mass. Cook till it gets a little dry – the saanza should not remain sticky. Remember it has to be stuffed inside dough and rolled into a poli – so it can’t remain sticky. The saaza takes about 5 mins to cook overall.

Keep the cooked saanza aside for 3-4 hours – it needs to cool down completely.

Making the Saanzori:

Make largish ladoos or balls of the saanza. Similarly, make small balls out of the dough. Wrap the dough gently around the saanza ladoos. Keep the wrapped saanza balls on a layer of rice flour else they stick to whichever surface you keep them on. Roll out into polis (rotis) and cook them on the tava like you would regular parathas or rotis, adding ghee while on the tava. The video depicts this saanzori making process.

Saanzoris last for a few days without refrigeration – so they are ideal to carry on a journey too.  They can be eaten as-is – though the make a great combo with lime pickle (or any other pickle, for that matter).


Daaleecha Sambaaraa

We all have our ‘comfort foods’ – and Daaleecha Sambaraa or Daaleechi Amti…or, as the Nadkarni family tends to refer to it, “Banda aamti” (after our ancestral hometown of Banda) is one such. A Sunday lunch of fried fish, kuleeth (horsegram) usal, kusbeer, Daaleecha Sambaaraa and Solkadhi….coupled with loud & boisterous conversation as we linger over the food long after our plates are dry…is enough to satiate the simple Nadkarni soul!

So without further ado, I present here a simple dal recipe that is unique in its taste. The interesting thing about this dal preparation is that NO OIL is used!

Version 1: With Drumstick-

Ingredients:

  • Toor Dal – 1 cup
  • Onion, medium size – 1, finely chopped
  • Drumstick – 1, with its skin removed and cut into approx 2 inch pieces. 7-8 pieces is what you would need
  • Fresh grated coconut – 2 to 3 tablespoons
  • Green Chillies – 4 to 5
  • Haldi (Turmeric) – 1/2 tsp
  • Tamarind – size of 1 lemon
  • Coriander
  • Salt to taste

Version 2: With Jackfruit seeds (see further below)

Procedure:

Keep about 1 tsp of the chopped onion aside

Soak the tamarind in some water and keep aside

Pressure cook the dal with some water for 2 whistles. Keep Aside

In a pan, pour about 2 cups of water and add the drumstick pieces, the remaining chopped onion, 2-3 green chillies (slit down the middle), turmeric and salt to taste (should be sufficient for the dal too). Cover with a lid and steam till the drumstick is fully cooked.

Then add the cooked dal and tamarind pulp (from the tamarind soaked earlier) and boil for a good five minutes – till the raw smell of tamarind fades away.

While the above is being steamed & boiled, grind the grated coconut, 1 tspn of chopped onion, 1 or 2 green chillies (depending on how much spice you can take) with a little water. Coarsely grind – take care that it doesn’t become a fine paste. This is known as the ‘Vatap’ or ‘Goli’ in Kokani.

Add this ‘vatap’ to the boiled dal above and bring it to a light boil. Add chopped coriander leaves and serve.

Daaleecha Sambaaraa is best eaten with rice

Daleecha Sambaaraa with Jackfruit Seeds:

Note – Whenever you have Jackfruit, wash the seeds thoroughly and dry them – in the sun, if possible- for a few days and store. You can make a number of delicacies with them and also use them to add some zing to other dishes like this dal or some bhajis (sabjis)

If you are lucky enough to lay your hands on jackfruit seeds, then this is the slight variation in the prep of Daaleecha Sambaaraa:

Remove the fine shell on the jackfruit seeds (if it still remains) and chop them into two or, at max, four pieces. When pressure cooking the dal, cook it with the jackfruit seeds and the chopped onions (unlike in the drumstick version where you cook the onion with the drumsticks)

Rest of the procedure is the same as in the drumstick version of the dal.

Phanasaachi Bhaji (Raw Jackfruit Bhaji)

Being Mother’s day today, what better occasion than to post a few recipes that my mom makes wonderfully well – which are nothing ‘elaborate’, but rather part of our everyday diet and those that one tends to long for after extended periods away from home. Here is the first of these – made from something that I love both in its raw form (as this Bhaji) as well as in its ripened avatar – Jackfruit or ‘phanas’ (as it is called in the konkan region)

Incidentally, raw jackfruit bhaji (or sabji) can be made at two ‘stages’ of the raw jackfruit :

  • One is when the jackfruit is really a ‘baby’ – small, tender, yet to be formed and is about 3/4th of a foot or smaller in length
  • Two is when it is fully grown and mature but yet to ripen.

In the konkan region, there is a special term used for each stage. The first baby raw phanas is called ‘Kuvra’ or ‘Kuvro’ while the mature one is called ‘Garyaa-Gotyaacha Phanas’.

This recipe is for a ‘kuvra’ phanas.

Note: While buying a Kuvra phanas, make sure that it is green…and the stem is also green. This is an indication of freshness.

Ingredients:

  • Kuvra Phanas / Raw Jackfruit – 1 (about 3/4th foot in length)
  • Toor Dal – 4 tspns
  • Onion (medium size) – 1, finely chopped
  • Fresh Coconut – grated – 1/2 cup
  • Whole Black Peppers – 8 to 10
  • Jaggery – 1/2 tsp
  • Mustard Seeds (rai) – 1/2 tsp
  • Turmeric (haldi) – 1/2 tsp
  • Asafotida (heeng) – 1/2 tsp
  • Green Chillies – 1 or 2, slit
  • Red Chilly Powder – 1/2 to 3/4th tsp
  • Oil – 1-2 tspns
  • Salt to taste

‘Prepping’ the Phanas:

The raw phanas is full of a kind of liquidy resin, called ‘dinka’ in Marathi/ Konkani. So before you cut the phanas, spread some old newspapers and apply some oil on the knife you use as well as smear some on your hands – else it gets difficult to get the sticky resin off later. As you start cutting the phanas, the ‘dinka’ starts oozing out – hence the old newspapers. Keep wiping off the ‘dinka’ with old newspaper bits.

Cut the phanas along its length into two halves. Then cut the individual halves into 2 or 3 pieces, so that each piece is approximately the size of your palm. Put these large pieces in water as you cut them and then wash them thoroughly 2-3 times.

Pressure-cook these pieces adding a little salt & water-  for 2 whistles & an additional 2 minutes on a low flame. Allow this to cool and then get to chopping the phanas for the actual bhaji. The pressure cooking is a short-cut to ensure that the thick skin/ cover of the phanas comes off easily.

Take the cooled pieces and cut out the skin as well as the thick portion at the centre of the phanas – the core. There is a special term for this portion as well in the Kokani (malvani) language – called the ‘maav’. The remaining part of the phanas is the edible part. Chop this into approximately 1 sq cm pieces. Now you are ready to make the bhaji

Procedure:

Wash and soak the toor dal in water for a few hours. (So make sure you do this either the previous night or a few hours before you intend to make the bhaji)

Grind the fresh grated coconut and the black peppers coarsely – it should NOT become a fine paste. Just ensure that the peppers get properly ground. Keep aside.

In a pan, heat the oil and add the mustard seeds. Once they pop, add the haldi, heeng and green chillies. Then add the chopped onion and saute till the onion turns transluscent. Next add the soaked toor dal and saute some more. Then add some water (about 1/4th cup) and steam, putting some water on the lid too.

Once the onion and dal is fully cooked, add the chopped phanas, red chilly powder and salt to taste (remember you have pre-cooked the phanas with some salt too – so account for that!). Mix it all together and steam, covering the pan with a lid.

Then add the ground mix of coconut+peppers and the jaggery, stir till they blend well with the rest of the bhaji and steam some more for a bit – and your Phanasaachi Bhaji is done!

Have with rice or chappaties (rotis).

Note: You can use Black peas (Kaala Vaataana) instead of Toor Dal too (just that kaala vaataana is not that easily available)

Aamba Daal

Aamba daal is one of those quick-n-simple recipes that make you wonder how such a simple recipe can taste so heavenly. Raw mango being an essential element of Aamba Daal (sometimes also referred to as ‘Vatli Daal or ‘Kairichi Dal’), it is a dish associated with summer.

In fact, during haldi-kunku gatherings – a popular social tradition in Maharashtra – in the month of Chaitra as per the Hindu Calendar, Aamba Daal & Kairi Panha is the standard menu. For me personally, Aamba Daal is very strongly associated with childhood memories of the 11-day Ganpati festival that used to be celebrated with great gusto at the Maharashtra Mandal in Chennai. For reasons I have never questioned, Aamba Daal used to be the standard menu on the last day of Ganpati – post visarjan – when we would trudge back after bidding adieu to Ganpati & eleven eventful evenings and be fed Aamba Daal to get our spirits up.

Ingredients:

  • Chana Daal – 1 cup
  • Green Chillies – 1 or 2
  • Fresh, grated coconut – 1 tablespoon
  • Raw Mango (grated) – 1 to 1.5 tablespoons (This depends on how sour the raw mango is – the more sour it is, the less you need)
  • Sugar – a pinch
  • Oil – 2 tablespoons
  • Mustard seeds (Rai) – 1/2 a tspn
  • Asafoetida (hing) – 1/4th tspn
  • Turmeric (Haldi) – 1/4th tspn
  • Dry red chilly – 1 (optional)
  • Coriander (chopped) – 1 tablespoon

Preparation:

Soak the Chana Daal for 2-3 hours at the minimum. Transfer it to a strainer and leave it for 10-15 minutes so that all the water is completely drained.

Then add salt & green chillies and grind it to a very coarse consistency. When using a mixie, this gets done in a jiffy so watch out as you don’t want a paste. Transfer to a bowl and add the coconut, raw mango and pinch of sugar to this, mixing well.

Make the tadka (or Phodni – as it is called in Marathi) in a tadka laddle or small pan. Heat the oil and add the mustard seeds. When they pop, turn off the gas. Then add the Hing, Haldi and red chilly (cut into 2 pieces). The red chilly is optional – it adds a certain flavour to the dish but also ups the spice levels.

Cool the phodni to room temperature. Then pour it over the Chana Daal mix & blend. Top it off with chopped coriander and get ready to dig into this yummy summer treat.

Aamba Daal can be eaten as is – as a snack or in lieu of a salad.


Panha

As summer manifests itself in all its glory in India and all of us look for avenues to beat the heat, a ‘must- have’ drink in this part of the world is ‘Panha’. Known by various names – Kairee Panha or Panhe, Aam-Panna, etc – this drink is also made with subtle variations across regions and households. The recipe below is my mom’s and is something you absolutely CANNOT afford to miss making during these hot summer months.

Combined with Aamba Daal, this makes a great summer evening high tea menu or even a light meal.

Ingredients:

  • Raw Mango or Kairee (Big) – 1
  • Jaggery – same volume as the Raw Mango (see recipe below)
  • Salt – to taste
  • Cardamom (Elaichi or velchi) powder – a pinch
  • Nutmeg (Jaiphal) powder – a pinch

Preparation:

Wash the raw mango and pressure cook it (without adding any water). After it cools down, break it open and take out all the raw mango pulp. Measure the volume of pulp and add the same volume of jaggery to it. Blend well and set this mix aside for an hour or so. This lets the jaggery soak properly in the pulp and melt a bit.

Then add salt to taste, and the cardamon & nutmeg powder and mix well – and the base Panha is ready! When you want to make the actual drink, add plain water (just like you would add water to a juice concentrate), top it with ice and serve.

Note:

  • The panha made as above is very thick and lumpy – and needs to be stirred quite a bit when making it into a drink. So some folks run the mix in a mixie with half a cup of water so it blends well and is smooth. You can try doing that.
  • The panha as above does not ‘stay’ for more than a day or so, even in a refrigerator. To ensure it lasts for a week or so, boil the mix slightly – that is, just till the first set of bubbles start. Do NOT do a full-fledged boil. And remember to keep stirring the mix as you bring it to a boil.

So go on..take on the summer with Panha!


Tisrya (Clams) Masala

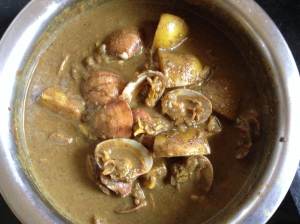
It has been many many months since we made ‘Tisrya’ (clams) at home – so it was decided that the situation has to be rectified promptly. Result was an oh-so-wonderful, Tisrya-focused, lazy Sunday lunch…as only Sunday lunches can be. So I decided I should be prompt enough in posting the recipe as well. So here goes…

Tisrya are made in many ways in the konkan region – sukha (dry), with gravy (which in turn can be a thick or watery), etc. This is the gravy-wala recipe.

photo2

BTW, for folks like me, cleaning & prepping the Tisrya itself is a learning. So for similar ignoramus/ novice folks, have done a detailed note below (after the recipe) on this aspect.

A couple of fundas before I begin:

– Like with certain other seafood, Tisrya are traditionally NOT eaten during the months of May, June, July & August (months which do not have an ‘R’ in their spelling) as it is the breeding season. While neophytes & commercial establishments ignore this, families like mine stick to this quite religiously.

– Small Tisrya are considered better – and tastier – than medium or large ones. So when you go shopping, don’t get tempted by the large guys.

Ingredients (for about 40-50 Tisrya):

General:

  • Tisrya – 40-50 pieces
  • Onions – 2 (medium size) – finely chopped (about 1.5 cups in volume)
  • Potato – 1 (large) – cut into 8 pieces, leaving the skin intact
  • Garlic – 15 pods (pounded)
  • Tamarind – size of one lemon
  • Hing (Asafoetida) – 1/2 tspn
  • Haldi (Turmeric) – 1/2 to 3/4 tspn
  • Red Chilli Powder- 1/2 tspn (can add more if your spice levels are higher)
  • Garam Masala – 1/2 tspn
  • oil – 2-3 tspns
  • salt to taste

For the Masala:

  • Onion – 1 large
  • Dry Coconut (copra) – a piece of approximately 2-3″ square dimensions
  • Fresh grated coconut – 1 tbspn full
  • Lavang (cloves) – 4-5
  • Dalchini (cinnamon) – 3-4 pieces (1 inch size)
  • Whole black peppers –7-8
  • Dhaney(coriander seeds) – 2 tspns
  • khas khas (poppy seeds) – 1/2 tspn
  • oil – 1 tspn


Procedure:

Soak the tamarind in some water and set aside

Making the Masala:

Directly roast the lone large onion directly on the gas on a slow flame till it turns black all over. Keep turning it so it gets roasted on all sides. An easy way to do this is to stick a fork into the onion so it becomes easy to keep turning it. When done, remove the blackened cover and chop into large pieces.

Similarly, roast the Dry coconut (copra) piece directly on the gas till it blackens all over. Scrape off the blackened portion slightly after it cools down – not completely though. The blackened portion adds to the taste. Then pound the copra piece well. (In kokani or marathi, this is called ‘thechaney’). Alternately, you can chop into fine pieces too

In a ‘tadka ladle’ (called ‘pali’ in kokani/marathi) or on any flat pan/tawa – add 1 tspn oil, the lavang (cloves), dalchini (cinnamon), black pepper and dhaney (coriander seeds) and roast well. Basically the dhaney have to get roasted well till they slightly change colour. Turned off the gas, then add the khus khus and mix well. The reason why the khus khus is added after the gas is turned off is because, otherwise, the khus khus gets burnt. Wait till this mix cools down.

Grind this along with the roasted onion, roasted copra and fresh grated coconut into a fine paste. The trick is to first run the mixie with these ingredients as is for one round, then add a little water and run it again. The resultant paste should be thick (not watery) and fine. Keep aside

Making the Dish:

In a pan, in 2-3 tspns of heated oil, add the pounded garlic pods, hing (asafoetida), haldi, finely chopped onions and salt (note that Tisrya are a salty seafood – so you need hardly about 3/4th tspn of salt for this quantum of Tisrya).  Roast till the onion gets a little soft. Then add the large chopped pieces of potato and the cleaned Tisrya (look below for how they are cleaned and one side of the shell removed) – and add water (Note: Use the water in which the Tisrya have been first warmed – see the prepping process described below). The water has to be just enough so that it is level with the Potato+Tisrya volume – roughly the same volume. To this, add the garam masala and red chilly powder. Cover with a flat lid and add some water ON the lid. Cook over a medium flame till the onion & potatoes get cooked. The Tisrya get done in the meantime. To check if the onion is cooked, take a small bit out and press. If it is soft and disintegrates easily, it means the onion is done. The whole process should take about 10-15 minutes for this quantum of Tisrya.

Once the onions and potatoes are cooked, add the tamarind pulp and boil well for a full five minutes – till the raw smell of the tamarind goes away.

Turn down the flame to low and add the ground masala and blend well. Add water if you want the gravy to be a little more ‘liquidy’. Basically, how thick or liquidy the gravy has to be is an individual preference – so you can decide. Bring the gravy to a light boil on the low flame. And your Tisrya are done.

Like a lot of gravies from the konkan belt, this dish tastes best when it is left aside for a few hours before eating. So try and make it at least a few hours before your meal.

Tisrya masala can be eaten with chapatties or rice. Nothing like having it with Solkadhi-Rice!


CLEANING & PREPPING THE TISRYA:

This is something that I have learnt only in the recent past. Listing down the steps below so the process is clear:

– When you buy the Tisrya – first of all, make sure that they are ‘clammed shut’. If they are beginning to open up, it means that they are not fresh

– Start the cleaning by washing the Tisrya thoroughly in running water. Do it 4-5 times till any residual sand/mud is washed off.

– Next the tisrya need to be split open as only half a shell with the meat is used in the dish and the empty half-shell is discarded. My parents tell me that in the ‘old days’, the Tisrya would be split open after they are washed over a ‘Vili’ – (a traditional cutter which is actually far more effective than a knife once you get the hang of using it!). Apparently this process of cutting the tisrya open – called ‘Karlaavnay’ – is a skill and not everyone could really do it. Luckily, the next generation of super-innovative ladies like my mom have come up with a much easier way of doing this. So you basically put the washed Tisrya in a pan, add some water (a little – just a tad lesser than that required to submerge all the tisrya) and heat it for about 5-6 minutes, keeping a lid on the pan. Check from time to time – you can see the Tisrya gradually opening up.  Put off the gas once they all open and let them be till they cool. IMP – DO NOT drain and chuck the water – use it for cooking as some of the flavour is drained into the water while the Tisrya are getting heated!

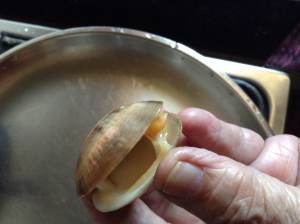
-This is how an ‘opened up’ Tisri looks like:

photo7

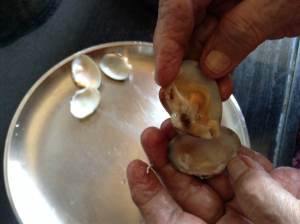
– Split this open so it looks like this (note that the two parts of the shell are still fused together at the central ‘hinge’:

photo6

– Next take the top shell and slowly twist it while gathering the meat stuck to the bottom shell. In the process, the two shells come apart. If they don’t, pull them apart 🙂

photo3


photo5

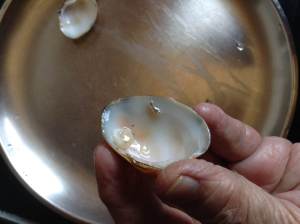
– Watch out for small silverish piece(s) that would – in all probability – be there in the meat. These are fine pieces of shell that need to be removed. In our part of the world, there is a specific name for this – called “kakri”.  Getting rid of the kakri is an important aspect of cleaning tisrya. The picture below shows you what a kakri looks like:

photo4

– Once you have separated the shells, gathered the meat and removed the ‘kakri’ – individually – you are ready to go ahead with cooking.

Whoever said making Tisrya was easy, huh? There is a lot of hard work involved – but well worth the effort!


Kaala (Black) Mutton

Happy Holi, folks! After a very long hiatus, this blog sees some activity. The much needed inspiration came from a dear friend who was determined to try out my mom’s signature mutton dish – Kaala (Black) Mutton. So we jotted down the recipe for her in staccato ‘whatsapp’ mode, which she faithfully followed and I was fortunate to relish the dish at her place amidst great company on a chilled-out saturday evening. (We also made mom’s stuffed pomfret, btw – which is going to be a separate post!)

This recipe has been handed down in my mom’s family. I recollect my beloved Usha Mavshi, my mom’s late sister, making this – it used to be, quite simply, THE VERY BEST.  Meticulous and the perfectionist that she was, she would line up all the ingredients precisely before embarking on the kaala mutton journey. This post is in the memory of Usha Mavshi.

BTW, making this mutton is indeed a ‘journey’ – elaborate that it is. This friend slogged over it for a good two hours!

Ingredients (for 1 kg mutton):

For the marination:

  • Ginger-garlic-green chillies-coriander-Pudina paste
  • Turmeric – 1 to 2 tspns
  • Curd – 4 tablespoons
  • Salt to taste

For the dry masala:

  • Lavang (cloves) – 10,
  • Dalchini(cinnamon) – 3 to 4 pieces (1 inch size),
  • Whole black peppers – 20
  • Badishep (Aniseed or Saunf)- 1 tspn
  • Velchi / Elaichi (cardamom)- 1or 2 pods
  • Dhaney(coriander seeds) – 2 tbspns
  • Dry red chillies – 7 to 8

For the ‘fresh’ masala:

  • Ginger – 3-4 slices,
  • Garlic pods- 4-5,
  • Onions – finely Sliced (not chopped) – 2
  • Fresh coconut – grated – 1 cup.
  • Dry coconut (copra) – grated – 1 cup
  • khas khas (poppy seeds) – 1 tsp full

Other ingredients:

  • Mutton – 1 kg
  • Onions – finely chopped – 2.5 cups
  • Shah Jeera (Black Cummin) -1/2 (half) tsp
  • Tejpatta (Bay leaf) – 2 or 3
  • Potatoes (Optional) – cut into large pieces
  • Tamarind – size of 1 lemon

Procedure:

Stage 1: Marination

Apply all the ingredients mentioned under marination above to the mutton (cut into pieces). Keep aside for at least an hour, if not more

Stage 2: On the side

Soak the tamarind in water and keep aside

Stage 3: Cooking the mutton

Add 1.5 cups of finely chopped onions to the mutton, add on sufficient water so that the whole mix is just-about submerged and pressure cook

Stage 4: Making the masalas

In very little oil, roast all the ingredients of the dry masala. Keep aside

In same vessel, in a little oil,  add the slices of ginger, garlic pods and sliced onions. After the onion browns, add the fresh grated coconut and roast till it becomes light brown in colour.  Then add the grated dry coconut (copra) and the khas khas and roast till golden brown.

Mix earlier dry masala to this and wait till it all cools down. Then grind it to a paste – not very fine though.

Stage 5: Putting it all together

In a little oil, add the Shah Jeera, Tejpatta and one cup of finely chopped onion and fry till golden brown. Add cubes of potato (optional). Add on a little water n cook till the onions n potatoes are fully cooked. Then add  the cooked mutton and the tamarind pulp (from the soaked tamarind) and boil till the raw smell of tamarind goes away. Then add the ground masala paste, adjust the water to the gravy consistency you like and bring to a boil on a slow flame for 2-3 minutes.

This dish gets its dark colour (hence ‘kaala’ mutton) from the tamarind basically. The older (mature) the tamarind is, the darker the colour)

You can have this mutton with rice or chappatis. Its best to cook the mutton at least a few hours before the meal and leave it aside. It tastes better that way 🙂

Mooga Gaathi Aamti

I am always amazed by the sheer variety of sprouts used in the cuisine in Maharashtra. On a recent visit to a traditional-style grocer (which is such a pleasant change from the supermarkets which are fast becoming a fixture in urban India), I saw a whole array laid out – and I must admit that I couldn’t identify all of of them correctly.

One of the popular variety, not just in Maharashtra but in many parts of India, is Moog (‘Green Gram’ in English, ‘Moong’ in Hindi). And in our family, Aamtis (curries) made from Moog are a favorite.

We primarily make two types of Moog Aamtis – one is ‘Mooga Gaathi‘, which this post is about and the other is the ‘Moog Green Aamti‘ – which is slightly different. Mooga Gaathi has its origins in Karwar, but is popular in our part of Konkan as well.

BTW, neither of the moog aamtis use onion or garlic – hence they come under the category of  what is known as “shivraakh” food in this region. Specific days of the week or certain festival days are reserved for Shivraakh cuisine. Moog Aamtis naturally find favour on Shivraakh days.

Note: The process of sprouting is a little long-drawn, taking about 36- to-48 hours. So you need to plan the preparation of this dish accordingly.

Ingredients:

  • Moog – 1 small cup or bowl
  • Coconut – pieces of small thin slices of fresh coconut (known as “kaatalya’ in Malvani Kokani), 1 tsp
  • Cashewnuts – pieces, 1 tablespoon
  • Salt
  • Turmeric (Haldi) – 1/2 tsp
  • Curry Leaves (Kadipatta) – 7-8 leaves
  • Tamarind – size of one small lemon

    For the Vaatap or Goli:

  • Dry Coriander seeds (Dhaniya) – 1 tablespoon
  • Red Chillies – 4 to 5
  • Coconut – fresh, grated – 1 cup
  • Black peppercorns – 6 to 7
  • rice/ rice flour – 1/2 tsp

For the Phodni or Tadka:

  • Mustard seeds – 1/2 tsp
  • Asafoetida (Hing) – 1/4 tsp
  • Curry Leaves (Kadipatta) – 5-6 leaves

Procedure:

Stage #1 : The Sprouting

Soak the moog overnight in water. Drain the water the next morning and put them into a sprout maker. If you don’t use/ have a sprout maker, use any sieve-like vessel and cover it or tie the soaked moog in a muslin cloth. Keep this aside for sprouting. Moog typically take at least 24 hours to sprout (longer is you live in cold climes).

Note: In Indian cuisine (vs, say, Chinese or South East Asian cuisines), the sprouts are not grown very ‘long’.

After the Moog have sprouted, you have an option of removing the skins of the sprouts. Some folks like to use the sprouts with their skins while some are very particular about taking them off. To remove the skins, again soak the sprouted moog overnight in water. The skins rise to the top which you can separate out. A few stray stubborn skins that refuse to come off can be gently removed by hand.

Now we move on to the actual preparation.

Stage #2: Cooking the sprouted moog

Pressure cook the sprouted moog adding 1 tsp of ‘kaatalya’ (small pieces of thin slices of fresh coconut), 1 tablespoon cashew bits, salt to taste (for these proportions, about 1 tsp flat of salt suffices), 1/2 tsp turmeric (haldi), 7-8 curry leaves (kadipatta). Add water to the vessel such that it is level with the mix.

Moog cook quickly – so usually 1 whistle followed by 3-4 mins on low heat is enough to cook the moog.

Set aside and allow to cool down

Parallely, soak the tamarind in a small bowl in slightly warm water – and set aside for an hour or so.

Stage #3: The Vaatap or Goli

Like with most aamtis or gravies from this region, the vaatap or goli is important – as it is the base for the dish.

For this, first dry roast 1 to 1.5 tablespoon of dhaniya (dry coriander seeds) and keep aside. Next, separately dry roast 4-5 red chillies and keep aside. Once both have cooled, add them to 1 cup of fresh coconut, then add 6-7 peppercorns and 1/2 tsp of rice or rice flour. The rice or rice flour is used as a thickening agent. Add a little water and grind to a fine thick paste. This is how it looks:

Note : You can make this Vaatap earlier and store it in the freezer – and pull it out for use when required.

Stage #4: Putting it all together

Now that you have got all the important ‘sub-components’ done, you are ready to make the Mooga Gaathi.

Make the phodni or tadka by heating 1 to 1.5 tsp oil in a pan, add 1/2 tsp mustard seeds and wait till they splutter, then add 1/4th tsp asafoetida (hing) and 5-6 curry leaves and saute for a min or so. Then pour the cooked moog and add on the tamarind extract (extracted from the tamarind you’ve soaked earlier). Boil for a full 5 mins till the ‘raw’ smell of tamarind goes away. Then add the vaatap and bring to a light boil. You can add a little more water if required to adjust how ‘liquidy’ you want the aamti to be, before bringing it to a boil. Mooga Gaathi is usually a thick gravy.

Eat with rice or chappatis / rotis.

Visit blogadda.com to discover Indian blogs

Golyaachi Aamti or Golyaachaa Saambaaraa

When we started this project, a number of relatives and friends got in touch giving us encouragement and suggestions for recipes that they’ve all grown up with or recollect from childhood. One recipe which was common across the various suggestions was Golyaachi Aamti or Golyaachaa Saambaaraa. This can be roughly translated as “balls curry”.

This vegetarian dish is indeed a delicacy from the region. Various regions of Maharashtra as well as other parts of India have a similar or equivalent dish. The recipe below is the way it is made in the Sindhudurg / Ratnagiri region. And yes, even within this region, different families and regions have their own little variations or special touches. The recipe below is from my mom and grandmother’s kitchen…

Ingredients:

Part #1 : For the ‘Golay’ or ‘Balls’

  • Gram Flour (Besan) – 5 tablespoons
  • Onion – 1 big or 2 small – finely chopped
  • Ginger-Garlic Paste – half a tsp
  • Red Chilly Powder – quarter tsp
  • Turmeric powder (Haldi) – half a tsp
  • Asafoetida (Heeng) – half a tsp
  • Oil – 1 tsp
  • Salt – 1 tsp

Part #2 : For the Goli or Vaatap

  • Coconut, fresh – grated – 2 tablespoons
  • Peppercorns – 5 to 7
  • Chopped onion (use from part #1)

Part #3 : For the Gravy or Aamti

  • Tamarind – size of one lemon
  • Oil – 1 tsp
  • Turmeric Powder (Haldi) – quarter tsp
  • Red Chilly Powder – quarter tsp
  • Salt – half a tsp
  • Chopped Onion (use from part #1)

Procedure:

Soak the tamarind in half a cup of water. Keep aside.

Also keep about 2 tsps of the chopped onion aside (one tsp for the Vaatap and one tsp for the Aamti)

First, we get the Vaatap done. Like in most curries from kokan, the Vaatap is the base for the curry. Grind the grated coconut, peppercorns and 1 tsp of chopped onion into a fine thick paste, adding water as required. Keep aside.

Next, we make the Golay or balls. Add the ginger-garlic paste, chilly powder, turmeric powder, asafoetida and salt to the rest of the chopped onion. Pour 1 tsp of oil on the palm of your hand and crush the mix well, till the mix is well blended. Add the besan to this mix along with some water. The resultant dough should not be very thick or dry. At the same time, it should not be watery. It should be thick enough to roll into balls. The picture below should give you an idea of how the dough should look:

Roll into small lemon-sized balls. These are the “Golay” of the “Golyaachi Aamti”. Note that these DON’T really get ‘rolled’ into perfect balls like when you make laddoos – since the dough consistency is not thick enough. So a ‘Gola’ looks something like this :

Keep the golay aside.

Now we start on the ‘Aamti’ or the curry. In a pan heat one tsp of oil and add 1 tsp of the chopped onion that you had kept aside. After the onion becomes brown, add two cups of water and the turmeric (quarter tsp), red chilly powder (quarter tsp) and salt. Let the water boil really well. Now drop the golay or balls into the water along with the paste of the tamarind that you had soaked initially. Note that the gas should be on full flame while dropping the balls. Reduce the flame once you are done.

The balls rise to the surface once they are cooked. Boil till this happens. Then, continuing on the reduced heat, add the ‘goli’ or ‘vaatap’ and bring the aamti to a low boil. And you are done!

Some folks add some ‘Goda Masala’ (a masala used fairly commonly in this part of the country) to the gola mix. Some add a bit of ‘Dhaniya-Jeera’ powder too. Some families like adding one or two bits of tiny coconut pieces inside each ball. So, basically, you can try adding these little touches to your Aamti too!

Golyaachi Aamti goes well with Rice or Chappatis.